


January 20, 2017
Although the wireless network becomes more and more popular for its convenience, most of our home still deploy wired connections with copper based devices that can work faster and more stable. Every so often, we get questions from people who plan to deploy copper based networks in their homes. The most frequent question we get is, "how to fast build a copper network at home?" Considering that, the following will give detailed instructions for building a copper home network in a very fast and smooth manner.
As the copper based network has an important place in the our daily life, it is very necessary to know the steps for deploying our own copper based network that is much easier than that of the fiber based network. Of course, before deploying, you should consider your requirements for the copper based network, such as, easier access to broadband and WiFi, higher network performance. Then let’s study the step by step instructions for building a copper network at home.
Bringing the Service Provider Distribution Cable to Your HomeNowadays, the distribution point of copper network cable or fiber optic cable is always installed inside or near the building by the broadband service provider, offering service for each house of the building. In some old buildings, the cables between the end users and distribution point are still copper based, while fiber optic based cables are usually used in the new buildings. If you are living in a new building with fiber optic based distribution point, then you need a ONU (Optical Network Unit) for converting the optical signals into electrical signals and distribute the signals to different ports and home devices. Hence, the service provider distribution cable can be brought to your home. At present, there are various ONUs and routers available on the market, supporting WiFi and satisfying various port requirements. If your home is not very big, you just need to choose one ONU or router for your home network.
Wiring the Whole Connection for Your HomeAfter introducing the service provider distribution cable to your home, you should decide how many ports your home network requires and how many devices should be connected to the network, which is very important for owning a home wired network with great broadband access. Due to the good preparation, you can do the whole home wiring smoothly without any delay. The following figure shows an example of the whole home wiring that connects the bedroom, living room, office and dining room of this house to the network for your reference.
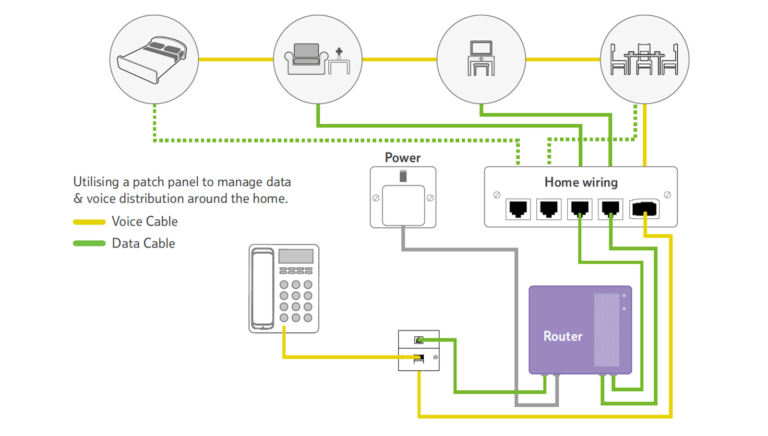
From the figure above, you can learn that there are several kinds of devices, such as, televisions and telephone, connected to the home wired network for better and smarter performance, which is also know as smart home. For instance, the voice cable is used for connecting the telephone to the network, so that the phone calls would be not missed by the house owner. Besides, other devices like air condition, light control device can be also connected to the home wired network for living in a smart home.
As for the types of the copper cables used for the connections between the network and the home devices, the Cat 5e and Cat 6 Ethernet cable are most commonly used copper based patch cables at present that completely satisfy the requirements of your network. However, the Cat 6a and Cat 7 Ethernet cable are more recommendable with higher performance which are capable of meeting the requirements for both now and future.
Terminating the Copper Cables and Finishing the Whole DeploymentThe third step is to terminate the copper cables that used for the whole connection, which plays an important role in deploying a secure and reliable wired home network. In general, the copper patch cable is suggested to be terminated at the wall plate port and a length of RJ45 copper network patch cable should be used for connecting the port with target device, thereby the whole deployment of home network can be finished.
This paper mainly studies the process of how to fast build a copper network at home, which is very useful for people who plan to deploy a copper home network for better performance. In strict accordance with the step by step instructions, you can easily and fast deploy your wired home network. Except that, choosing the most suitable patch cable also can’t be ignored for good broadband access. You can choose one of the most suitable patch cable from the mentioned above Cat 5e, Cat 6, Cat 6a and Cat 7 Ethernet cable to meet the requirements of your network.
Posted by: katherinewangfs at
07:14 AM
| No Comments
| Add Comment
Post contains 781 words, total size 6 kb.
January 18, 2017
With the rapid development of the network technology, the network deployment becomes much more complicated than ever before to satisfy the increasing network needs. In order to deploy the the complicated cabling network in a tidy, fast and correct manner, the patch panel is designed to better manage the patch cables in the network, which can be divided into two types, the copper patch panel and the fiber patch panel. To avoid the connection errors and making the cabling network flexible, reliable and neat, this paper will mainly introduce some commonly used types of the copper patch panel that may be helpful for you to pick the most suitable one for your cabling network.
While the copper patch panel has made a great contribution to the complicated cabling network as a cost effective solution, the type of the copper patch panel has become more and more diversified, such as, shielded and unshielded patch panel, flat and angled patch panel, common and high density patch panel, classified according to the designed aspect. The following will discuss the details of these four types of commonly used copper patch panels.
Shielded vs. Unshielded Patch PanelSince the performances of the shielded and unshielded patch panel are different from each other, you should consider that should the patch panel be shielded or unshielded to fit your network before ordering the copper patch panel. Besides, you may also wonder that can you use the shielded patch cable with an unshielded patch panel or the unshielded patch cable with a shielded patch panel? Let’s explore these questions and seek the answers.
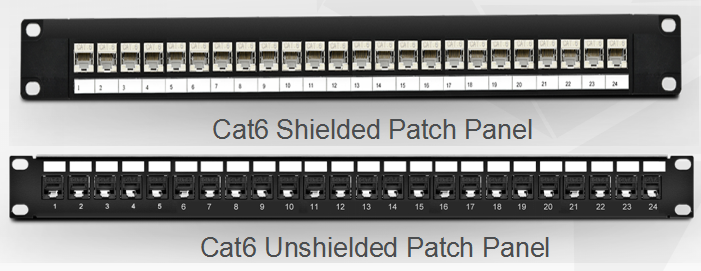
There is no doubt that the shielded patch panel performs higher than the unshielded one, because the shielded feature enhances the anti-interference performance of the copper patch panel and protects the high speed network from noise and EMI (Electro Magnetic Interference). Considering that the interference is really a risk for the network that may cause transmission errors or failures, the unshielded patch panel is designed for the common applications where the EMI is not very high, while the shielded patch panel is more suitable to be used in the environments with high EMI. Besides, you can also select the patch panel according to the network speed. Moreover, if your network is a 1G Ethernet network, then both the shielded and unshielded patch panel can be chosen. But if the network is a 10G Ethernet network, then you are highly suggested to choose the shielded one. For better know the two types of patch panels, here offers a figure that shows the structural difference between the Cat6 shielded patch panel and the Cat6 unshielded patch panel.
Can you use the shielded patch cable with an unshielded patch panel? It relies on the network environment. In simple words, if there are no high power electrical wires in the network, then you can use the unshielded patch panel. But if arc welders, high power radio transmitters or other high power electrical equipment near the network, you should better go with the shielded patch panel. As for using the unshielded patch cable with an shielded patch panel, it is OK in theory but unnecessary in practice. Because the shielded patch panel is much expensive than the unshielded patch panel.
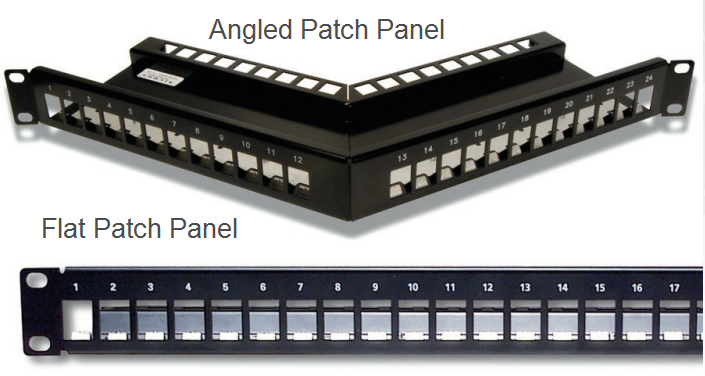
Flat vs. Angled Patch PanelOn the basis of the appearance design, the copper patch panel can be classified into flat and angled patch panel, as shown in the following figure. The flat patch panel enables the horizontal cabling and routes the cables into vertical cabling, while the angled patch panel makes the cable termination easy and patch cord routing improved. Compared with the former one, the angled design of the latter one increases the rack density, managing high-density applications in one-fourth the area needed for conventional cable management systems. But taking the front depth requirements of the angled patch panel into account, the angled patch panel is not so good for the cabinet installation as the flat patch panel.
As there are often 8 or 12-port configurations on the common patch panel, the high density patch panel is usually designed with 24 or 48 ports as an ideal solution for the applications where there is limited space. Since there are much more ports in the high density patch panel to connect and manage the incoming and outgoing Ethernet cables, it has the ability to conserve the rack space. Hence, if the space is limited in your network, then you can choose the high density patch panel to deploy your network cabling.
After discussion, it can be concluded that the unshielded patch panel is suitable for the applications where the EMI is not very high, while the shielded patch panel is more commonly used in the environments with high EMI. It can be also concluded that the flat patch panel is a good choice if you want to easily deploy the patch panel. Otherwise, the angled patch panel is highly suggested. Besides, if there is limited space in your network, you are recommendable to choose the high density patch panel rather than the common one for conserving space. For easier network deployment and better cabling management, you’d better pick the most suitable patch panel for your cabling network.
Posted by: katherinewangfs at
09:31 AM
| No Comments
| Add Comment
Post contains 888 words, total size 7 kb.
January 13, 2017
There is no denying that it is very convenient for the public to use the wireless network, which is more and more popularly used in recent years. However, if the high speed and efficiency are required, the wired network must be more suitable for you to choose, which always works with Ethernet patch cables to enable a more secure network with faster speed. In general, except for some special devices like cellphone that can only used in the wireless network, the rest of your devices will perform better in the wired network.
Would you also like to deploy a wired network for your home? Since the deployment of a wired network is more sophisticated than that of a wireless network, this paper will present some considerations for you to set up a fast and smooth wired home network.
Before deploying the wired network, there are some points that you should take into account. Firstly, you must decide how many rooms you want to run your wired network through, which will mainly determine the deploying budget. Because it will dictate how many feet of Ethernet patch cable you need to use. Secondly, you must confirm how many devices you would like to connect to the network and where you decide to locate them. Thirdly, since there may be a lot of Ethernet patch cables put in use in the wired network deployment, the wire distribution also becomes very crucial for a neat and smooth wired network which you should attach importance to. Considering that these Ethernet cables would be easy to mess up, you’d better to design the wired network and consider all possible problems that may occur during the installation.
Besides, there are two notes that you should also pay attention to when designing the network. The one is not to place the Ethernet patch cables near the devices, for instance, microwave and TV, which will have a negative effect on the performance of data transmission. Another one is to put the router in a central place of your network, ensuring good signals when your network runs.
As we all know, choosing a proper patch cable is extremely important that can make a great difference to the network speed. If you want to gain a stable network with high data transmission rate, then you should choose the most suitable cable for your network. At present, the patch cables used for the wired networks are usually Ethernet patch cables, which can be divided into various types, such as, Cat 5, Cat 5e, Cat 6, Cat 6a, Cat 7 patch cable, etc. Among these types, Cat 5e and Cat 6a patch cable are more commonly used the wired network in recent years, both of which are highly recommended as the cost effective solutions.
After making the decisions about where and how the cables will be distributed, you should firstly measure the distances of the connections in your network and calculate how long the Ethernet patch cable the whole connection needs, as the Ethernet patch cable is the main equipment in the network. To avoid some unexpected issues, the whole length of the Ethernet patch cable you prepare should slightly longer than the calculated length.In addition, there are many other tools you should also prepare before the installation, for example, wall plates, jack ports, drywall cutters, cable clips, etc. All these tools will be used in the installing process. Hence, you should check and confirm the preparation, so that the installation procedures will be smoothly processed as planed.
There is no doubt that the wired network performs higher than the wireless network, although the deployment of the wired network is much more sophisticated. If you want to own a more secure and faster network, then the wired network would be a better choice for you and the points mentioned above are three important factors that would be useful for you to make a fast deployment for the smooth wired home network.
Posted by: katherinewangfs at
09:02 AM
| No Comments
| Add Comment
Post contains 681 words, total size 5 kb.
January 11, 2017
The patch panel, also known as the patch bay, patch field or jack field, is a functional unit with a number of same or similar jacks, designed to conveniently and flexibly connect, disconnect and monitor circuits in the cabling network. There is no doubt that the patch panel plays an important role in collecting data and routing it to the intended destination, with the function of enabling the ease of cabling network management and avoiding the data transmission error or failure.
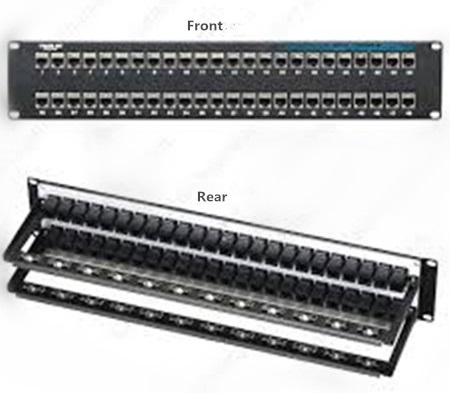
At present, there are both copper and fiber patch panels available on the market, both of which are very popularly used due to their features and advantages. To better know about the patch panel, here offers a kind of 48 port cat6 patch panel in the following figure. From this figure, you can easily learn the appearance of the front and rear of the 48 port cat6 patch panel.
We used to regard the patch panel as the "traffic light†for our cabling network. Is there any evidence to support this statement? In fact, we can’t deny that no matter how large or small the patch panel is, it is always the crucial element in our cabling network that has the ability to terminate cable elements and transmit the signal to the final destination. Moreover, using the patch panel can better install and manage the multiple cables in our cabling network, for an easier cabling management.
With the mentioned above advantages and constantly improved functions, the patch panel becomes more and more commonly used in computer networking, recording studios, radio, television, etc. Since it is so important to our system, we should ensure that there is no problem with the patch panel before our system runs. Because if there is something wrong with the patch panel, the data would be transmitted wrongly or unsuccessfully.
As the patch panel is so crucial in the administration of the telecommunications network, it is highly recommended to select a proper patch panel for better cabling management. Since there are both copper and fiber patch panel available on the market, let’s discuss the advantages and disadvantages of the two kinds of the patch panels and select one type which is the most suitable for our system.
It is well known that the patch panel can be part of networks with either fiber or copper cabling. As fiber can transmit the signals faster than copper, does it mean that fiber patch panel performs better than copper patch panel in the cabling network? The answer is no. Why? Because all the patch panels are subject to the same standards that provide signal and speed performance ratings for other network components, no matter which materials the patch panels are made up of. Meanwhile, the patch panel is primarily used for directing signal traffic rather than move signal at a required speed. Hence, the materials of the patch panels do make little difference in the cabling performance. As for the manufacturing cost, fiber patch panel is much expensive than copper patch panel that can be up to 40 percent higher. In short, copper patch panel is really a good choice for cabling network if the three factors mentioned above is considered.
Is there any advantage if we choose the fiber patch panel for our cabling network? Of course. The fiber patch panel has only two ports and doesn’t require the hardwiring, which is much easier to install than the copper patch panel. After all, each pair of the wires should have a port if you choose the copper patch panel, which may take more time to install.
The patch panel is the "traffic light†in cabling network which allows for terminating long and troublesome cables, enabling the signals to be transmitted directly through a patch code to its destination. Although there are both copper and fiber patch panel available on the market, the copper patch panel is highly recommended as an cost effective solution. Do you consider owning one copper patch panel at hand? You can simply get it from FS.COM that offers 24 port cat5 patch panel, 48 port cat5 patch panel, 24 port cat6 patch panel and 48 port cat6 patch panel.
Posted by: katherinewangfs at
08:28 AM
| No Comments
| Add Comment
Post contains 722 words, total size 5 kb.
January 06, 2017
Although the copper-based patch cable performs not so well as the fiber patch cable in Ethernet network, it is still popularly used due to its advantages of low cost, high flexibility, easy installation and operation. So far, there are various kinds of copper-based patch cables that were published and came into the market in succession, such as, cat5/cat5e, cat6/cat6a and cat7 Ethernet cable, etc. Among these copper-based patch cables, Cat5e and Cat6 Ethernet cable are two of the most commonly applied types that have similar features and functions, which may be a little hard to distinguish. Do you also feel confused? Let’s study the knowledge of these two patch cables and acquire which one is more suitable and cost effective to be used.
Cat5e Ethernet cable is an improved version of Cat5 Ethernet cable, published in early 2001. In comparison with Cat5 Ethernet cable, it has a very similar appearance, but composed of four pairs of copper wires rather than the two pairs that cat5 Ethernet cable features. Furthermore, the pairs of copper wires in the Cat5e Ethernet cable are twisted more tightly, reducing or eliminating the crosstalk when working in Ethernet network. After the upgrades, it has become the most common type of Ethernet cabling applied in modern homes and offices, offering much faster transmission rate, wider bandwidth and higher performance. From the following figure, you can see a blue Ethernet cable on the left side which is just an example of the Cat5e Ethernet cable.
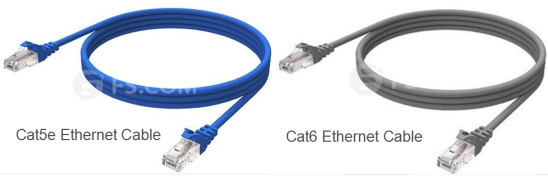
The one on the right side of the figure is a Cat6 Ethernet cable, which was introduced to the market a year later than the Cat5 Ethernet cable. It is usually made up of four unshielded twisted pairs (UTP) and terminated with RJ45 jacks, capable of supporting the 10Base-T (Ethernet), 100Base-TX (Fast Ethernet), 1000Base-T (Gigabit Ethernet) and 10GBase-T networks. Compared to the Cat5 Ethernet cable, the Cat6 Ethernet cable increases the frequency responses, tightens the crosstalk specifications and introduces more comprehensive crosstalk specifications, for a greatly enhanced performance.
After knowing the basic information of cat5e and cat6 Ethernet cable, you must recognize that these two Ethernet cables feature different characteristics and perform differently, even if they seem to have common in appearance and function. Then what’s the detailed information about the differences between cat5e and cat6 Ethernet cable?
Different Transmission SpeedThere is no doubt that the transmission speed is always the priority if you are considering making the upgrades for your Ethernet network, so does the upgrades from cat5e to cat6 Ethernet cable. As the cat5e Ethernet cable is able to used in 1GBase-T network at most and can only performs up to 100 MHz, the cat6 Ethernet cable is improved to support 10GBase-T network with data rate of up to 250 MHz that is more than twice that of the cat5e Ethernet cable.
Different Transmission DistanceAs we all know, cat5e and cat6 Ethernet cable are copper-based patch cables which are only able to transmit signals for very short distances. What’s more, the data rate also affects the transmission distance. In simple words, the higher the data rate is, the shorter the transmission distance will be. Hence, when the signals are only need to be transmitted in a low data rate, both cat5e and cat6 Ethernet cable have the ability to transmit them at lengths up to 100 meters. But if the data rate is required to be the maximum speed, the cat5e and cat6 Ethernet cable can only reach 37 meters and 50 meters, separately. If transmission distance is longer than 100 meters, you are suggested to use the repeaters or switches to amplify the signals.
Different ReliabilityThe network reliability is also an important factor that you should take into account when deploying your network. Because if there are serious electrical interference in your network, the network reliability may be not so good and negatively influence the performance of your network, thereby the data transmission in your network would be in a wrong way or failed. To ensure a more reliable and stable network, the reliability upgrades is also done from cat5e to cat6 Ethernet cable, with the improvement of deterring signal interference from affecting your network. By using the advanced cat6 Ethernet cable, you’ll be able to have a longer and more reliable period of uptime, regardless of how close your network is to other surrounding networks.
The upgrades always occur with improved features swiftly, like the copper cable upgrades, to face the increasing requirements of the Ethernet network. Since the cat6 Ethernet cable is designed with the improved features of faster transmission speed, longer transmission distance and higher reliability, it is much more commonly used than cat5e Ethernet cable that can be available at a little expensive cost. Hence, you are strongly recommended to use cat6 Ethernet cable to deploy your network with higher performance.
Posted by: katherinewangfs at
10:21 AM
| No Comments
| Add Comment
Post contains 828 words, total size 6 kb.
January 04, 2017
It is well known that network patch cable can be commonly wired as straight-through or crossover cable, used for data transmission. Both of these two network patch cables are made up of four pairs of high performance twisted wires with different colors, terminated by the RJ45 keystone jacks at each side of the cables. As for their applications, they are designed for serving different aims, with different wire arrangements inside their cables, which will be introduced in the following text for guiding you to pick the most proper one for deploying you network.
Before discussing the differences between the straight-through and crossover cable, it is necessary to introduce two wiring standards, T568A and T568B, for better understanding the different wire arrangements in each kind of the cable. These two kinds of wiring standards are recognized by ANSI, TIA and EIA for wiring the network patch cables. Generally, the T568B wiring standard is more widely used than the T568A wiring standard, as the default wiring scheme for twisted pair structured cabling. If you are unsure of which to use, then choose T568B to arrange the wires inside the cable.
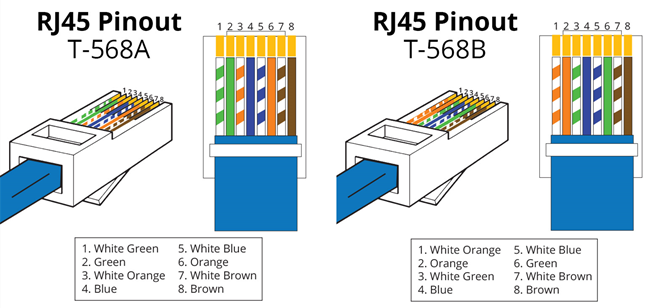
In general, there are eight colored wires in a straight-through or crossover cable, which should be arranged according to the corresponding order of the wiring standard T568A or T568B. That’s to say, the wires with different colors should be terminated in the right positions of the RJ45 keystone jack where the wire colors and the colors in the RJ45 keystone jack are the same, as shown in the figure above.
When choosing the network patch cable in the store, you’ll easily find the straight-through cable that is commonly used to connect computers to hubs or switches. While the crossover cable with the function of connecting a computer to another computer should be a little hard to find since this kind of network patch cable are not so commonly used as the previous one. But what are the differences between the straight-through and crossover cable? Let’s talk about this topic.
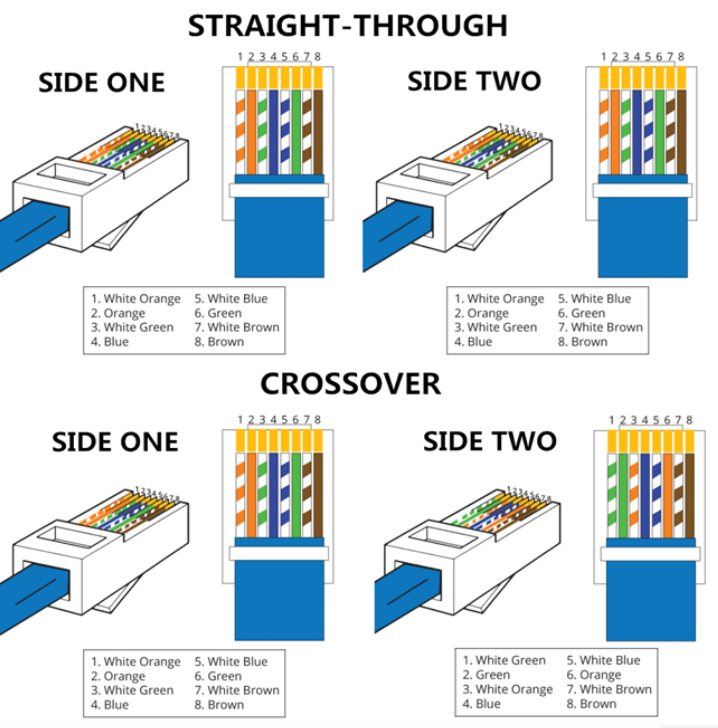
Different Wire ArrangementsAs mentioned above, these two kinds of network patch cables have different wire arrangements. For a straight-through cable, there should be only one wiring standard used. It means that both ends of one straight-through cable can be only wired according to T568A wiring standard or T568B wiring standard. Since T568B wiring standard is more popular, here offers the example of a straight-through cable with T568B wiring standard in the following figure. As for the crossover cable, it is designed with two wiring standards in both ends of the cable. In simple words, if there is a RJ54 keystone jack with T568A wiring standard in one end of the crossover cable, there must be a RJ54 keystone jack with T568B wiring standard in the opposite end, as shown in the following figure.
The two kinds of network patch cables are available in the market, used for different applications. As for the straight-through cable, it is applied in local area networks to connect different kinds of devices, for instance, connect a computer to a switch/hub's normal port or a cable/DSL modem's LAN port. It can be an alternative to wireless connections where one or more computers access a router through a wireless signal. As for the crossover cable, it's usually used to connect same type of devices, such as, connect two computers directly, connect two switches/hubs by using normal port in both switches/hubs.
After discussion, we can concluded that the straight-through and crossover cable are designed with different arrangements, serving for different applications. The straight-through cable is usually used for connecting two different kinds of devices, while the crossover cable is highly recommended in the applications where same kind of devices need to be connected. If you want to distinguish the two kinds of cables, you can just check the color orders for the wires inside the RJ45 keystone jacks at both ends of the cables. If the color orders of the wires are the same on both ends, it means the network patch cable is a straight-through cable. If not, it must be a crossover cable or there may be a wiring error in the cable.
Posted by: katherinewangfs at
08:37 AM
| No Comments
| Add Comment
Post contains 714 words, total size 6 kb.
32 queries taking 0.0695 seconds, 71 records returned.
Powered by Minx 1.1.6c-pink.

